
Off-grid monolithic dwellings designed to harvest atmospheric moisture in the driest desert on Earth.
In this beginner-friendly tutorial, you will learn how to self-host your own website(s) from home at a near-zero cost.
For individuals and businesses alike, being absent from online spaces is increasingly difficult. Yet most people still pay substantial annual subscriptions to hosting providers to create and maintain a professional presence online. This guide aims to change that, and, along the way, help you save a lot of money.
The direct costs of self-hosting are limited to two things. First, you need a domain name to be able to access your website online and you can buy one from any domain registrar of your choosing. Personally, I use Cloudflare. Also, you need to consider your energy bill, even though the electricity consumption for a web server like the one we are building here is marginal.
Once you have purchased your domain, the next step is deciding how to run your web server. A server can take several forms: a dedicated bare-metal system, a container, or a virtual machine. Exploring the differences between these options is beyond the scope of this guide, but you can consult a guide I prepared previously on the subject here.
For this tutorial, the web server will run inside a LXC container hosted on Proxmox. If you are planning to build a homelab, Proxmox is an excellent choice because it is a business-grade software that lets you self-host multiple applications and services on a single machine.
The Content Management System (CMS) I will use for the sake of this tutorial is WordPress. This CMS recommends a modern PHP release, MariaDB or MySQL, and a web server such as Apache with URL rewriting enabled.
You will learn how to:
- Create a LXC container in Proxmox using a Linux distribution of your choosing (Debian or Ubuntu).
- Install Apache2 (Apache HTTP Server). Apache2 is a free and open-source cross-platform web server, released under the terms of Apache License 2.0. It is developed and maintained by a community of developers under the auspices of the Apache Software Foundation.
- Install PHP. PHP is a general-purpose scripting language geared towards web development. PHP code is usually processed on a web server by a PHP interpreter implemented as a module, a daemon or a Common Gateway Interface (CGI) executable. Of course, you don’t need to master all these information as of now.
- Install MariaDB. MariaDB is a open-source relational database management system sharing a common heritage with MySQL, from which it was forked in 2009 by original MySQL developers following Oracle Corporation’s acquisition of Sun Microsystems, with the intent to keep it free and open-source software under the GNU General Public License. Create a database and database user for the WordPress site.
- Download and set up WordPress.
- Create a VirtualHost for your WordPress using Apache2.
- Configure DNS record.
- Connect remotely and securely to your webserver using OpenSSL.
- Obtain a trusted HTTPS/TLS certificate to secure your website by encrypting traffic between visitors and your server. This tutorial will use a Nginx Reverse Proxy Manager to automate certificate attribution.
#1 Create a LXC container in Proxmox
You will be asked for:
- CT ID: You need a number starting from 100 and above. I highly recommend that you have a logic behind this numbering.
- Hostname: It is completely up to you to choose.The hostname shouldn’t contain any spaces or special characters. In case you are not sure about this, that is okay because you can change this later.
- Password: Avoid sequential and easy to guess password. This puts your server at a huge risk.
- Template: You need to download an ISO image for your operating system. If you want an Ubuntu Server image, go to Ubuntu Server downloads. Click the download button. Once downloading begins, Ubuntu redirects you to a ‘thank you’ page. Cancel the browser download because you do not need to download the ISO to your computer first. You only need the direct download link. On the page, find ‘Your download should start in the background. If it doesn’t, download now.’ Copy the hyperlink behind download now. Now that you have a copied link, return to Proxmox and click on your local Proxmox storage (pve local). Open ISO Images → Choose Download from URL → Paste the URL → Query it, then download the image.
- Disk Size: Set the disk size to 15–20 GB. One of Proxmox’s useful features is that you can increase the disk size later if needed. For a self-hosted website containing articles and embedded videos—but no self-hosted video files—you will typically need 5–20 GB of storage to begin. The exact requirement depends on your site’s scale and expected growth. Text uses very little space. Even 1,000 articles of roughly 2,000 words each may use only about 20–30 MB. Embedded videos do not use your server’s disk space because YouTube, Vimeo, or another video provider stores the actual video files. The main storage consumers are: CMS core files (e.g. theme and plugins), images, database, backups, logs, and email.
- Set the CPU to 1 core to start. Recommended CPU cores by traffic
- RAM: Set RAM to 1 GB.
- Network: For networking, the correct settings depend on your network installation. Most people use a router or modem provided by their internet service provider (ISP). In that situation, set both IPv4 and IPv6 to DHCP. Your ISP router will then assign the container an IP address.
- DNS: Not need to set the DNS for now. You can change these settings later.
The LXC container is now ready to be launched. Go to the console and log in. The username is root by default, and the password is the one you chose while creating the container.
Once you are logged in, run the following commands to check for updates on your Linux distribution
apt updateIf you want to see all available updates, run the following command to list them.
apt list --upgradableWhen you see the word Exit at the bottom instead of your normal user-and-hostname prompt, press q to leave the list.
Upgrade all of them by running
aptupgrade -y
Now that this work has been completed as root, create and use another user for security reasons. Think of root as a god-mode user on Linux distributions. It can change almost anything, so it should not be your everyday account. Run:
adduser mahmoudYou will be prompted to provide a password and personal information. Type your answers or press Enter to ignore. Give your new user sudo privileges by running:
usermod -aG sudo mahmoudVerify that a user directory was created by running the following command. ls here stands for ‘list.’ You should see a folder named for the user you created.
ls /homeYou already set your hostname when you created the LXC container. But if you want to change it from the terminal, edit the hostname and hosts files to update, add or adjust your hostname or domain name to the instance.
sudonano/etc/hostnamesudonano/etc/hosts
When creating the container, you told Proxmox to accept the IP address assigned by your Internet Service Provider (ISP). Now you need to discover which IP address the server received.
ipa
An important point: some routers assign dynamic IP addresses. You do not want your server’s internal address to change unexpectedly. To make sure that it will remain static, open a web browser and visit your home router’s administration page by entering its IP address. In the vast majority of home networks, the router’s IP is: 192.168.1.1. Log in, open the advanced network settings, look for the DHCP server settings, and choose an IP address that is logical and easy to remember. Create a DHCP reservation for the container so it receives the same address consistently.
#2 Install Apache, PHP, and MariaDB
Now that your server preparation is complete, build the web server. Start by installing Apache2 and MariaDB. Run:
sudo apt install -y apache2 mariadb-server \
php php-mysql php-gd php-xml php-mbstring php-curl php-zip
Check which MariaDB security scripts and database commands are present:
which mysql_secure_installation
which mariadb-secure-installation
mysql --version
mariadb --version
Secure MariaDB and create a database. The mariadb-secure-installation utility is intended to remove insecure defaults, such as anonymous accounts and the test database. On Debian, local root access often uses Unix socket authentication, which relies on the operating-system account rather than a separate database password. Run:
sudo mariadb-secure-installationYou may see an output similar to this:
NOTE: MariaDB is secure by default in Debian. Running this script is useless at best, and misleading at worst. This script will be removed in a future MariaDB release in Debian. Please read/usr/share/doc/mariadb-server/README.Debian.gz for details.You will be prompted to create a password to protect the root user in MariaDB.
Enter root user password or leave blank:
Enter current password for root (enter for none):
OK, successfully used password, moving on...
If you do set a new password, answer the following questions as shown below.
Switch to unix_socket authentication [Y/n] n
Change the root password? [Y/n] n
Remove anonymous users? [Y/n] y
Disallow root login remotely? [Y/n] y
Remove test database and access to it? [Y/n] y
Reload privilege tables now? [Y/n] y
All done! If you've completed all of the above steps, your MariaDB
installation should now be secure.
Thanks for using MariaDB!
Now, run MariaDB
sudo mariadbCreate a database for your website. You need to replace <database-name> by another name of your choosing. It is important to remember the database name because you will need it later in WordPress installer.
CREATE DATABASE <database-name>;Grant database access to the WordPress database user. Replace <username> and <your-password> with a powerful and unique password.
GRANT ALL PRIVILEGES ON <database-name>.* TO '<username>'@'localhost' IDENTIFIED BY '<your-password>';Verify it worked
SHOW GRANTS FOR '<username>'@'localhost';Reload privileges
FLUSH PRIVILEGES;Exit MariaDB:
EXIT;#5 Install WordPress
With all preparatory software downloaded, it is time to download WordPress. Download WordPress and place it in /var/www/<your-domain-name>
cd /tmp
wget https://wordpress.org/latest.tar.gz
tar xzf latest.tar.gz
sudo mkdir -p /var/www/<your-domain-name>
sudo cp -r wordpress/* /var/www/<your-domain-name>
sudo chown -R www-data:www-data /var/www/<your-domain-name>
#6 Create Apache virtual host
Add a configuration file for WordPress to Apache. Replace <file-name> by a name of your choosing. I recommend that you use your domain name (e.g. ecitizenproject.conf).
sudo nano /etc/apache2/sites-available/<file-name>.confReplace <your-domain-name> by your real domain name in the following text, then copy paste it to your terminal editor.
<VirtualHost *:80>
ServerName <your-domain-name>.com
ServerAlias www.<your-domain-name>.com
DocumentRoot /var/www/<your-domain-name>

<Directory /var/www/<your-domain-name>>
AllowOverride All
Require all granted
</Directory>

ErrorLog ${APACHE_LOG_DIR}/<your-domain-name>_error.log
CustomLog ${APACHE_LOG_DIR}/<your-domain-name>_access.log combined
</VirtualHost>
Save the file by pressing the letter Ctrl o followed by Enter. Then, Ctrl x to exit
Enable site and rewrite module
sudo a2enmod rewrite
sudo a2ensite <your-domain-name>.conf
sudo a2dissite 000-default.conf
sudo systemctl reload apache2
Test locally first. Open a browser in a device on your local network and type http://<your-server-IP>. You should see the WordPress installer. Choose your language and continue. Use the same <database-name>, <username> and <password> that you defined in MariaDB. Then head to log in.
#7 DNS Configuration
Next, configure DNS records so that visitors who enter your domain name, either with or without the www prefix, are directed to your home network’s public IP address. Log into your account on the domain registrar provider’s website (Cloudflare in my case) to add and manage DNS records.
An A record connects your domain to your public IPv4 address, while an AAAA record connects it to your public IPv6 address. A CNAME record makes www.your-domain.com point to your main domain, ensuring both addresses reach the same website. Don’t forget to enable Cloudflare’s proxy for each of these three records. If you don’t know your public IP, visit www.whatismyipaddress.com to find both (IPv4 and IPv6).
In your Cloudflare dashboard head to DNS → Records → Add record → Create a record
Type: A
Name: @
Target: Your public IPv4 address
DNS proxy = ON
Type: AAAA
Name: @
Target: Your public IPv6 address
DNS proxy = ONType: CNAME
Name: www
Target: <your-domain>.com
DNS proxy = ON#8 Obtain a trusted HTTPS/TLS certificate
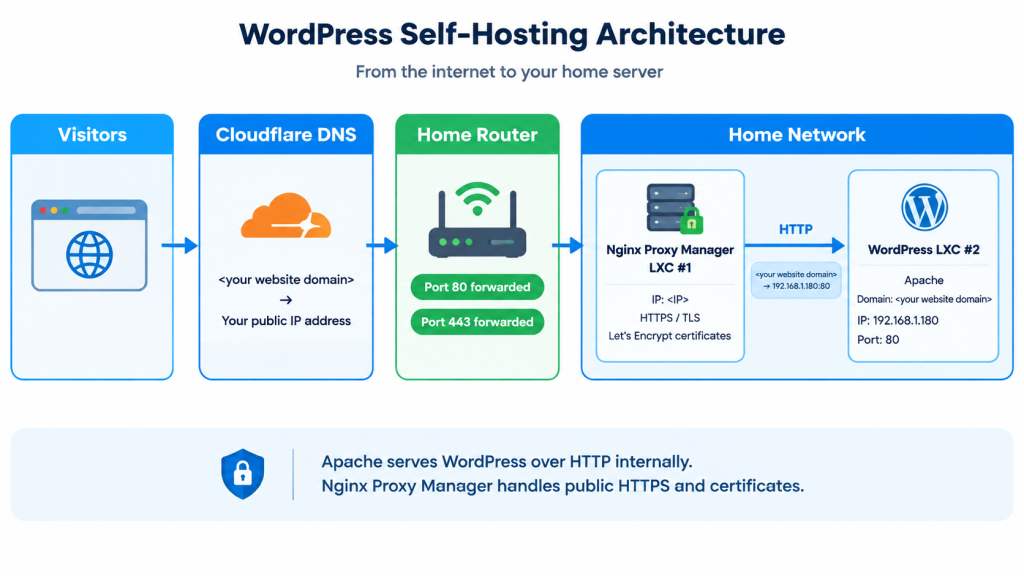
This tutorial uses Nginx Proxy Manager (NPM) running in its own dedicated LXC container, to direct incoming visitors to the correct self-hosted service. This is especially useful when you host several websites or applications from the same home network. However, a reverse proxy is not essential if this WordPress website is the only service you plan to self-host. In that case, you can obtain and manage an HTTPS/TLS certificate directly on your server using Certbot. The differences between these two approaches, and when each one is most appropriate, are explained in more detail here.
Log in to your NPM. Then head to Proxy Hosts → Add Proxy Host.In Details
Domain Names: <your-domain-name>.com    www.<your-domain-name>.com
Scheme: http
Forward Hostname /<your-server-IP>
Forward Port: 80
Block Common Exploits: ON
In SSL
Request a new SSL certificate (Let’s Encrypt)
Force SSL: ON
HTTP/2 Support: ON
HSTS Enabled: ON
Use DNS challenge: Choose your DNS provider from the list
Credentials File Content: paste Cloudflare API token in Nginx.
Save
Now https://<your-domain>.com should reach the WordPress installer over HTTPS via NPM.
You now have a fully functional website that you self-host yourself. Bravo!